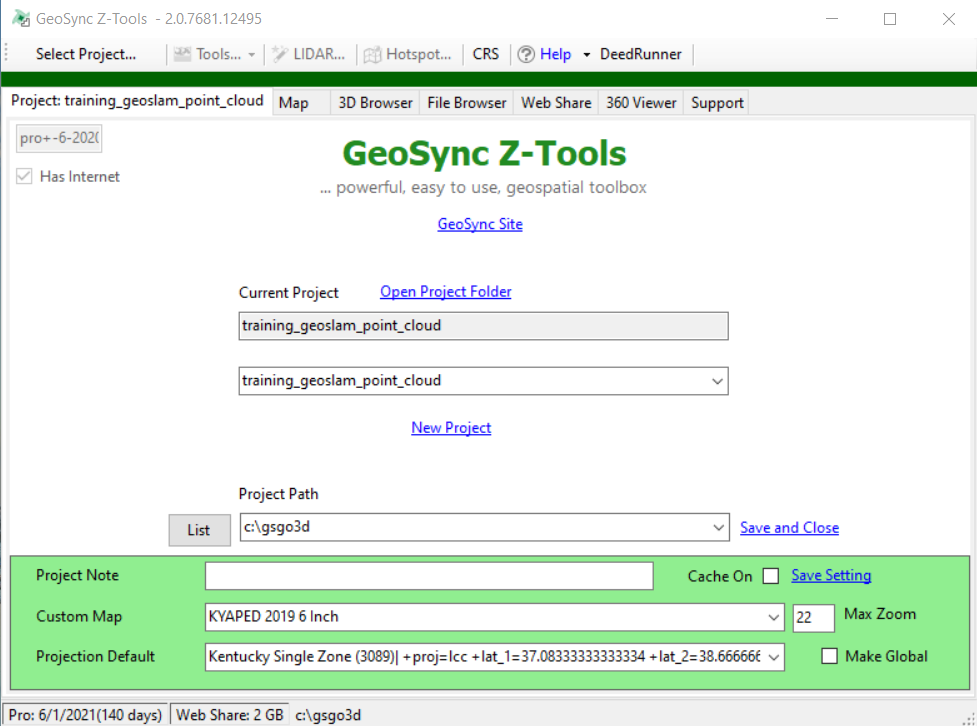
Z-Tools Main Screen
The main screen provides access to manage projects along with tabbed options to open the project map, the 3D browser tool, project file explorer and settings options.
Main Toolbar: from left to right…
-
Current tool label: Displays the name of the current tool
-
Tools Dropdown Menu: List of processing tools. Tools Dropdown is only enabled when the Map interface is active.
-
LIDAR Wizard: Primary tool for finding, downloading, clipping, and processing public point clouds. The LIDAR clipping and processing tool can be utilized with any point cloud.
-
CRS: quick access to project coordinate settings
- Projection Settings Link
- Search Button: Search the included NAD83 projection list.
- Save Button: This list of projections will save and will be available in both ZTools and 3D Publisher.
- Edit the list: Add a new line. Map Projections Format: NAME + (AUTHORITY CODE) + | + PROJ4 String
- Example: Missouri East Feet (102696) |+proj=tmerc +lat_0=35.83333333333334 +lon_0=-90.5 +k=0.9999333333333333 +x_0=250000 +y_0=0 +ellps=GRS80 +datum=NAD83 +to_meter=0.3048006096012192 +no_defs
- Projection Settings Link
-
DeedRunner: This is an included application for checking deeds.
-
Help Videos (Click the down arrow button): Access to indexed training / help videos for Z-Tools. These are updated as new videos are created.
-
Tabs:
- Project
: Create or Select Existing Project - Enter Project Default Settings – Bottom of page
- Set the projection and click Save to set a project default
- Check the Global option to make the selected projection the Z-Tools global default.
- ZMap Defaults
- Project Reference Layer: Set a saved XML layer as a reference
- Global Custom Map: Choose between Kentucky Base Map, Tennessee Base Map or Imagery Max Zoom: Set the max zoom for the map (22 is the largest number). Larger number represents closer zoom.
- Map Cache On: set the map cache mode. If this is unchecked the map will download tiles each time it opens. If it is checked (default) it will utilize cached map tiles for better performance. The only reason to disable this function is if you are using user cached XYZ_Tiles for your background.
- Save: saves project settings to a file stored in the project folder.
- Map
- Street map interface for creating project clip boundaries, viewing hillshade tiles, and ortho photo tiles. When the map is active the Tools dropdown and LIDAR wizard menu items are enabled.
- 3D Browser
- Click the refresh button to generate a tree list of all published 3D Views in your current project directory. The current project is highlighted in green. Select the published 3D file and click the Open 3D View to view in the 3D. The FREE edition only allows you to open 3D Views from the current project. The PRO edition allows you to browse and open published 3D views from any project.
- File Browser
- Docked version of the Project Folders and Browser Tool for quick access to folders in the current project. Select a folder in the tree and click the Browse button to open a Windows Explorer Folder Window.
- Support
- Paths Tab – set key project paths
- Project Path: Location of project data. Z-Tools adds a “\Project” to this path before adding the project name. If you want to move the path to another drive change the path and close the application. When you reopen Z-Tools the new path should be active. Z-Tools will deploy some setup files to this new folder in order for certain tools to function properly.
- Root Path: Path for key Z-Tools components. If this path is changed the folders “grids” and “programs” of the current root path will need to be copied to the new location. It is recommended to maintain the default folder location.
- OSGeo4W64 Path: ZTools utilizes this library for many of its processes. This folder is created when Z-Tools is initially installed. The folder can be moved to another location but using the default location is best.
- Paths Tab – set key project paths
- Files Tab – summarize project file counts and overall hard drive usage.
- Read Me Tab – includes update notes on new features and fixes as well as software license credits and links to products used in the development of Z-Tools
- Activate – tool for register your Z-Tools software.
- Register – opens dialog to enter Customer ID and Registration Code and register the software. Requires an internet connection.
- Clear – clear the registration information and closes the application. You can now use the registration on another computer. User Grids – tool for viewing available
- Project
-
User Grids (Index Files) for use with the User ZTile Download tool. Deploy the files from the right pane to the left to make them available for the tool to use.